

A freeriding tour is great for those skiers who like to write their own rules and go off the beaten track. But, going on a freeride tour or for a powder skiing day requires some planning and preparation. Having the right equipment is paramount to your safety and the fun you’ll have.
Choosing what to pack is mostly dependent on the type of tour you’re doing, how long you will be away, and where you will be doing your skiing. We will bring you the best tips for your freeride and backcountry day tours and focus on the dos and don’ts when packing for your tour.
In this article, we will look at a few of the essentials you should consider and we have included a handy downloadable packing list to make things a bit easier.
What to Consider When Preparing for a Skiing Tour
There are many things that should be considered when preparing for a freeriding tour. The most important are:
- Skiing and safety equipment
- Drinks and food
- Clothes
Let’s break each of these down and identify the essential and most important things to pack for your next skiing tip.
#1: Skiing and Safety Equipment
Here is a list of the essential items of skiing and safety equipment you should take with you on a skiing trip.
Skis
Choose your skis according to the terrain and snow conditions you will be skiing in. If your destination requires a bit of a hike, keep this in mind when choosing your skis. Remember to choose your skis according to your height, the snow conditions, and the type of skiing you will be doing. For more information on the various types of skis available and the types of skiing they are best for, please see the articles attached.
Ski Skins
If your freeride tour takes you to the very top of a high mountain slope that requires a hike to get to (more than 10 – 15 minutes per ascent), you can use ski skins to give you better traction on the snow. Ski skins are available from sporting goods stores that sell skis and are relatively inexpensive. However, you should be aware that, in order to get the real advantages of ski skins, you need skis with touring bindings.
Touring Bindings
If your Freeride adventure needs you to hike more than 10 – 15 minutes per ascent, you should choose Touring bindings on your skis. Touring bindings allow you to release the heels while you are in the bindings with the boots so that you can walk much more comfortably with your skis.
Crampons
Crampons, like ice spikes, are used for traction. They can be attached to your snow boots to help you easily maneuver your way up a mountain slope when the conditions are icy.
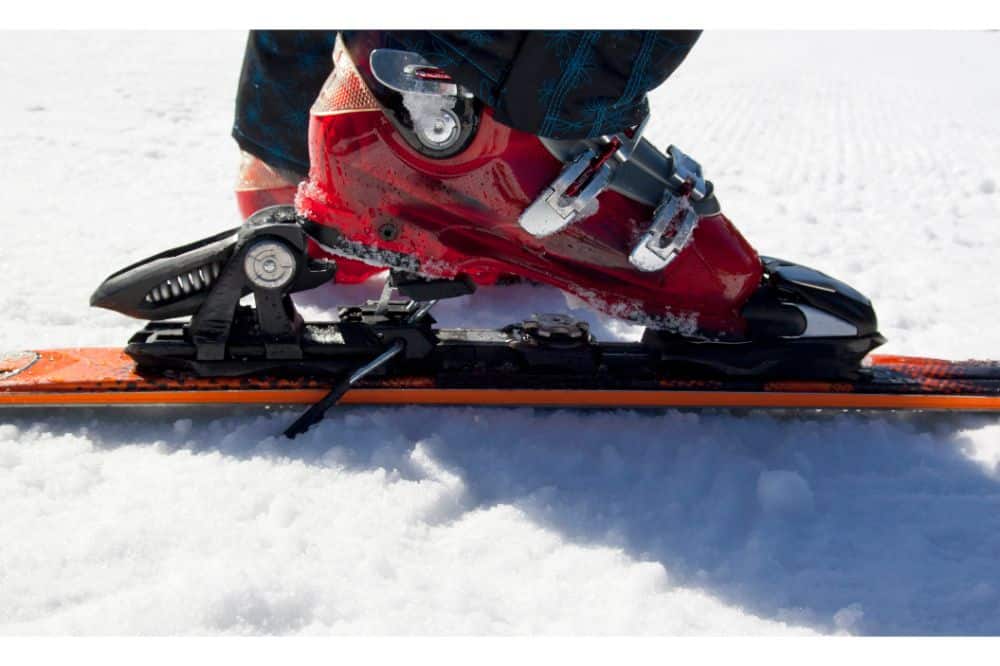
Ski Boots
It is very important to bear in mind that there are specific ski boots for various types of skiing. If you are going off-piste, it is best to wear freeride or normal piste boots that are more solid and provide stability. Mountaineering or touring boots are designed for hiking and are lightweight and are the right choice if you plan to walk for longer distances and time during your freeride day.
The number one feature that you should be considering when choosing a pair of ski boots is comfort. The boots should provide the best support, as well as be comfortable to ensure your safety and comfort while skiing on any terrain. A comfortable fit can reduce the pain and irritation that comes with wearing ill-fitting ski boots.
Ski Poles
Telescope poles are ideal for freeride tours which include a longer hiking part. Lightweight and sturdy, they are great for stability and maneuvering your way up or down a mountain slope.
If you only walk short distances and focus more on the ride down, normal ski poles do their job perfectly.
Avalanche Beacon
On the off chance of a sudden avalanche, it is a good idea to carry an avalanche beacon with you. Although they are rather expensive, they can help rescuers to locate you should you be caught in an unexpected avalanche and buried under the snow.
Probe and Shovel
This is another must-have that will likely save a life in the event of an avalanche. A probe and shovel will aid you in finding a buddy who might be buried under the snow and is one of the more important safety tools you should be carrying with you when on a freeride tour. Avalanches often come with no warning, so preparing for any eventuality is key in keeping yourself and others safe from danger.
A probe will help locate a skier trapped under the snow, and the shovel is used to free them. It can also be used to locate other skiers that might be trapped under the snow.
Thermal Blankets
Mother nature is certainly a force to be reckoned with. Don’t get us wrong, she is beautiful but has her mood swings, and the weather can change rather drastically. Thermal blankets are small enough to be slipped into your backpack and will keep you warm if you are injured or stuck on the mountain.
Goggles
Depending on how high you climb and the weather conditions, you might just find yourself hiking or skiing in falling snow. A good pair of goggles will help keep your eyes clear and protected.
The harsh white of the snow combined with the glare of the sun often makes it difficult to see or navigate your way around the mountain. Ski goggles will help shield your eyes from the glare, and also protect your eyes from the snow and air that is kicked up while skiing through fresh powder.
Helmet
Even the best freeriders tumble from time to time. The best you can do is protect yourself from hidden obstacles is a helmet. Wearing a helmet when skiing can help protect your head from injuries should you fall, and it is definitely one of the essential things to consider when choosing safety equipment.
Sun Protection
It’s snowing, which means you don’t need sunblock or sun protection, right? Wrong! Although the outdoor temperatures in the snow are low, the sun reflecting off the white of the snow can still cause sunburn. It is always important to use sun protection when skiing.
A Light Source
The sun goes down a lot earlier in the winter months and depending on where you are skiing, you could be caught off guard and find yourself in the dark. Always carry a light source like a torch to help light up your way when on a freeride tour.
A First Aid Kit
Accidents are bound to happen when skiing, so carry a few essentials in a first aid kit that you can keep in your backpack. This should include an anti-bacterial cream, band-aids, a few bandages, and an emergency blanket.
A Map of the Area
Laying out your route before you head off on your skiing adventure is part of the preparation process, but it does help to carry a map of the area with you at all times. The worst thing you want is to find that you have wandered off the “path,” and you are stuck in the middle of absolutely nowhere with no idea where to go.
A Backpack or Avalanche Airbag
A good, lightweight backpack is essential to carry your skiing necessities. Choose one that has various pockets and compartments, and pack it before you head out. If you are skiing in an area that is risky and might experience avalanches, an avalanche airbag should be your first choice.
Tools and a Repair Kit
A small tool kit containing the essentials to repair a ski pole or skis is a must. Take note of what you will need to make minor repairs to your equipment, and ensure that you have those tools available in your kit. Pop your tool kit in your backpack and you’re good to go.
#2: Food and Drinks
Choosing the right food and drinks for your freeride tour is important. Here are our best tips on what you should consider packing in to stay hydrated and boost your energy.
Drinks or a Thermos Flask
Fizzy drinks, fruit juices, and any drinks that contain a lot of sugar will only dehydrate you. Choose drinks containing electrolytes, and always carry a spare water bottle with you. A thermos flask will help protect your drinks from freezing.
Food
When we talk about food for a freeride tour, we are not saying pack yourself a full meal. Protein-rich snacks like energy bars can give you a good boost when you need it most and also come in easy-to-use sachets. Keeping your energy levels up is important, so avoid foods like bread that will make you feel sluggish.
#3: Clothing
Choosing the right clothing for your freeride tour takes careful planning, and clothes must be chosen carefully, too. Let’s look at the best clothes you could wear and pack on your freeride tour.
Layered Clothing
Layers are great and ideal for mountain hikes and ski tours. Ideally, you should wear three layers:
- A base layer consisting of thermal or skiing underwear
- A mid layer which is made up of a fleece jacket and warm pants
- An upper layer of a thick skiing jacket that includes a beanie, hood, and gloves
Keeping yourself dry while on the mountain slopes is essential, so choose underwear and socks that are made from thermal materials.
Other Clothing Items You Should Consider:
A few other items you should consider when going on a freeride tour are the following:
- Clothes to change. Snow can leave your clothes damp, and that’s when the cold and even hypothermia can set in. Always carry a spare, warm, and dry change of clothes in your backpack.
- Gloves. Gloves keep your hands warm while hiking and skiing. Many skiers wear thinner gloves while hiking to their skiing spot and a thicker pair for the descent. Thick gloves may make it tricky to use your ski poles, so choose gloves that are warm but comfortable enough to grip your poles. Ski gloves also come with a tab that can be attached to ski poles for convenience.
- Ski Socks. Carrying an extra pair of socks is essential. Ski socks should be made of warm yet breathable fabric. Choose ski socks that come just below the knee to keep your legs and feet warm, and change them if you feel yourself starting to sweat.
- A Cap and sunglasses. The sun’s harsh reflection on the surface of the snow can cause a glare that can hurt or even damage your eyes. Wearing good-quality sunglasses and a cap can help prevent that glare from reaching your eyes and impeding your vision. Check out your local sporting goods store for your skiing sunglasses.
Sunglasses are good for wearing while hiking up the mountain, while ski goggles are ideal for the descent down the mountain through fresh powder and will protect your eyes from the harsh glare or snow that is kicked up by another skier.
Conclusion
Preparation is key when packing for a freeride skiing tour. Using our guide above, you, too, can ensure that you have the essentials and that you are prepared for every eventuality. Remember to take a look at our downloadable packing guide and use this to help you prepare.
Freeride Tour Packing Checklist
Skiing and Safety Equipment
- Skis
- Ski skins (if needed)
- Crampons (if needed)
- Ski boots
- Ski poles
- Avalanche beacon
- Shovel and probe
- Thermal blanket
- Goggles
- Helmet
- Sun protection
- A light source
- First aid kit
- Map of area
- Backpack or avalanche airbag
- Tools and repair kit
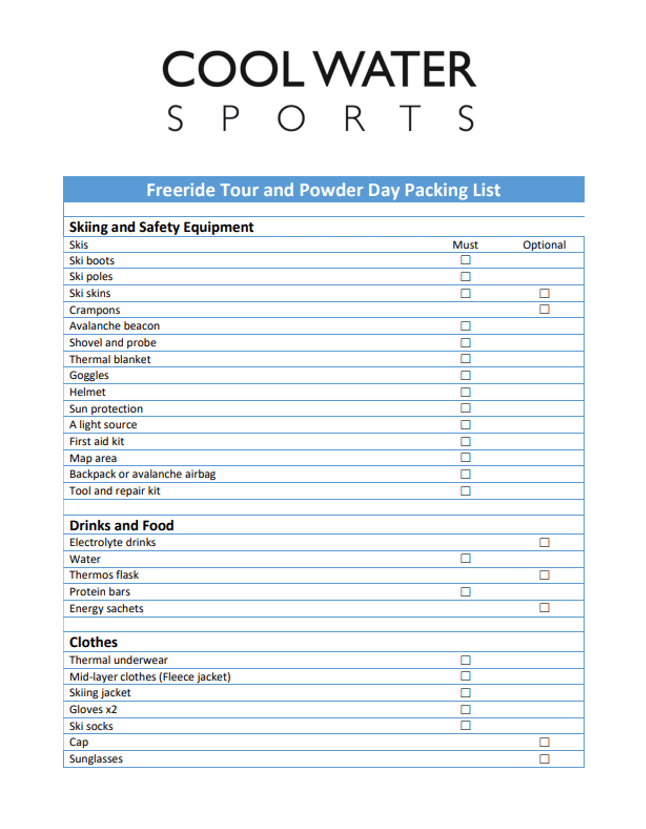
Drinks and Food
- Electrolyte drinks
- Water
- Thermos flask
- Protein bars
- Energy sachets
Clothes
- Change of clothes
- Thermal underwear
- Mid-layer clothes – fleece jacket and pants
- Skiing jacket
- Gloves x 2
- Ski socks x 2
- Cap
- Sunglasses
Conclusion
Being well prepared for a day of Freeriding isn’t that big of a problem. Start with a proper route planning, check out where you want to go and have a look at the avalanche situation. Afterwards, depending on what you are up to, use the checklist we provide to make sure that you have everything what you really need with you.