Stand Up Paddle Board Tips – the third part of our “How to Stand Up Paddle Board”.
Learn the most essential things you need to know about SUP Paddle Board Technique.
In this 3rd episode, we’ll show you you how to move forward really efficiently and quickly!
In this article, we show you everything necessary about the SUP Paddle Technique, especially the Paddle Stroke:
- How to paddle correctly and efficiently?
- What are the different phases of the SUP Paddle stroke, and what do I have to consider in each phase?
- What are the different styles of the Stand Up Paddle Stroke?
- What should you do when there is a strong wind, and your strength is weakening?
Maybe you think everyone can paddle! This is certainly not wrong. But here we show you how to progress faster with less effort. So take 5 minutes…
If you are looking for other information and tips on Stand Up Paddle Boarding, take a look at our complete Paddle Board Technique rubric. There is a good chance that you will find an excellent guide to your question.
In our stand up paddle instructions, we assume that you own or rent the required material. If not, check out our overview of boards and the Buying Guide!
As always, the “Safety Disclaimer” applies: stand up paddling is a water sport! You should, therefore, always adhere to the most important safety rules. If you do not know them yet, check them out quickly here.
The Proper paddle stroke, or Paddling, is not tricky – proper paddling all the more so
Stand Up Paddle founder Dave Kalama compared the complexity of correct paddle movement with teeing off in golf. And everyone knows hitting a small ball with control and distance into a particular place has its difficulties…
But don’t worry: In contrast to golf, you can have a lot of fun on the board, even as a beginner and even if you do not yet have such a good technique.
But it’s just like this: the more quickly and easily you progress, the more your fun level increases!
SUP Paddle Technique: The 5 phases of the basic stroke
The Paddle Stroke in Stand Up Paddling is divided into 5 phases:
- Reach or starting position
- Catch or immersion phase
- Power or follow-through phase
- Exit or retrieval phase
- Recovery or pre-catch-up phase
You should pay attention to the following regarding your standing position and paddle posture in all of these phases:
- Stand loosely with slightly bent knees at the sweet spot
- Look straight ahead in the direction of travel and not down at the board
- If you paddle on the right side of the board, your right hand is at the bottom (the shaft hand is on the right)
If you paddle on the left side of the board, the left hand is at the bottom (the shaft hand is on the left)
The First phase of the SUP Paddle Stroke – “Reach”:
In the starting position, the paddle should be as far forward as possible above the water.
Goal: The further forward you insert the paddle, the more effective the paddle stroke becomes.
The reason is that the more extended range increases the path and thus the effect of the power or pull phase. As we know, efficiency is a vital part of the proper SUP paddle technique.
The Second phase of the SUP Paddle Stroke – “Catch”:
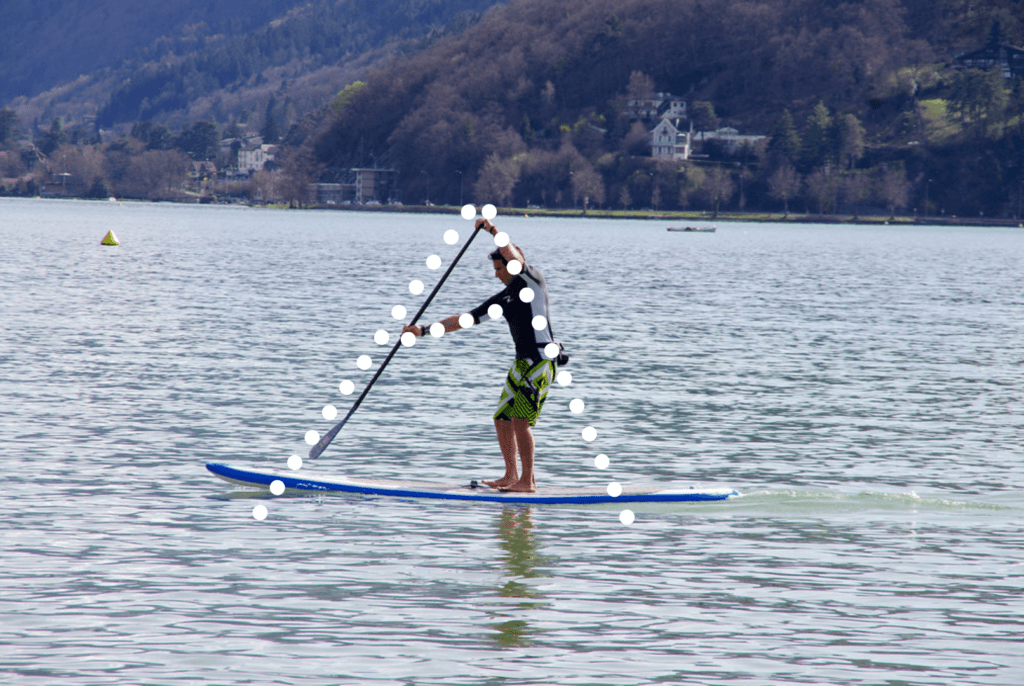
The catch is the phase in which the paddle is immersed in the water.
When catching, make sure that you constantly immerse the paddle up to the transition from paddle blade to paddle shaft.
Important: In the reach and catch phase, your body and your paddle form an A.
This is achieved by moving your upper body back and forth, keeping it straight (!!!). You push your shoulder and the (stretched) shaft arm (i.e., the arm of the shaft hand) forward. Your body can rotate a bit, even in the area of your hips and legs.
The Third phase of the SUP Paddle Stroke – “Power”:
In the power phase, you do your propulsion. This means that in this phase, you pull the paddle past the board from front to back.
Important: Make sure that you pass the paddle close in to the board.
The paddle shaft should also be vertical. This means that you bend your hip from the front slightly.
The force during the pull does not come from bending your arm but from rotating your torso.
So try to keep your arms more or less stretched during the whole power stroke!
When pulling through, you put your weight-bearing leg on the paddle side and rotate your upper body in the direction of the paddle pull. During the power phase, your upper body also straightens up, and the bend in your hip disappears at the end of the turn (i.e., your hip moves towards the paddle).
The power phase ends when the paddle blade is approximately level with your feet.
If you were to pull even farther from here, your paddle blade would no longer point cleanly in the direction of travel but point upward more and more. This means that you are no longer putting power only into propulsion but into churning the water…
The Fourth Phase of the SUP Paddle Stroke – “Exit”:
The goal of the exit is to turn the paddle out of the water as quickly as possible without resistance and without slowing down your propulsion.
The exit starts as soon as the paddle has reached about your heel height.
You turn the paddle blade away from the board with your top hand. This means that the thumb of your top hand then faces in the direction of travel.
The arm of your shaft hand is bent in the elbow by about 90 degrees and guided in front of your hip. At the same time, your top hand pushes the paddle sideways and down.
By turning the paddle blade and tilting the paddle sideways, you can also make the final phase, recovery, more efficient.
The Fifth and last phase of the SUP Paddle Stroke – “Recovery”:
In the recovery phase, you bring the turned paddle out of the exit with a flowing rotation, both in your body and your top hand, back to facing forward towards the bow.
Due to the simultaneous rotation of your body and your top hand with the stretching of your shaft arm, your paddle will automatically return to the proper starting position for the next paddle pull.
Two special tips for an even better SUP Paddling Technique
Bonus SUP Technique Tip 1:
If you’re really determined to get the last per cent of effort out of yourself, try the following:
Depending on the board type, even if you paddle closely to the board, you have to change sides every 3 – 6 paddle pulls in order to go straight ahead.
Next time, make sure that you change the paddle side in the front area of the recovery phase, i.e. close to the reach.
You will find that you will move a lot faster when changing the paddle side…
Bonus SUP Technique Tip 2:
You may have heard that there is a so-called Hawaiian Paddle Stroke and a Tahitian Paddle Stroke.
But what’s the difference? And for whom is which one better suited?
The basic stroke is carried out in the same way in the procedure and the technique. This is what’s different:
- Hawaiian Paddle Stroke:
Powerful paddle pull in which you can use the full length from a wide reach to your heels. - Tahitian Paddle Stroke:
It is a less powerful paddle pull, which is also much shorter. This then requires a higher paddle frequency to get the same speed.
Which paddle stroke is better cannot be said, so we recommend that you try both types and then choose the technique with which you feel more comfortable.
Conclusion and summary of the correct paddle stroke in stand up paddle boarding:
For your training on the water, take the following important information from the graphic with you on the way:
The 5 Phases of the Paddle Stroke
Reach, Catch, Power, Exit and Recovery
First Phase: Reach
Execute the reach as far as you feel comfortable. To do this, stretch out the shaft hand and bend the upper body forward.
Pay attention to the correct paddling posture.
Second Phase: Catch
Make sure you always immerse the paddle blade completely (i.e., in the transition between the paddle blade and the paddle shaft).
Third Phase: Power
Perform the pull with your arms more or less outstretched. The force comes from rotating and straightening your body, using the larger muscles and fatiguing less quickly.
Make sure you stroke with the paddle close to the board. This makes it easier for you to go straight ahead.
The power phase ends approximately level with your heels.
Fourth Phase: Exit
Turn your top hand at heel height so your thumb faces approximately in the direction of travel. Your shaft hand should be in front of your hips.
At the same time, lift the now-horizontal paddle blade out of the water as your top hand presses the paddle handle sideways and down, and your shaft hand pulls it sideways and up.
Fifth Phase: Recovery
Swing the paddle forward to the reach position by bending your upper body forward again with your shaft arm extended.
Are you not sure how to hold the Paddle correctly or how to get up on the SUP Board?
No problem. Have a look at the 1st Part and 2nd Part of our Stand Paddle Technique series.
Special SUP Technique tip: What you can do in the wind
For beginners, we definitely recommend that you take your first rides in calm weather, especially with little wind. Nevertheless, you can be surprised.
And while tailwind, especially in combination with wave swells, is ultra-fun («downwinding»), that fun may disappear quickly if you’re trying to reach your destination against a headwind.
What do you do then, especially if you get tired?
It’s simple: Reduce the surface exposed to the wind!
This means:
- In medium conditions, you can get into the kneeling paddle position. If necessary, you can read how to do this here. Ideally, you should then set your paddle a little shorter. But if you don’t have an adjustable paddle, just keep paddling with both hands on the shaft.
- In strong winds, you often have no choice but to lie down on the board and paddle home in the style of a wave surfer. You can easily clamp the paddle under your chest (with the paddle blade up!) so that you don’t lose it.
So now, you know everything necessary about the right paddle stroke.
Off into the water!
HOW TO STAND UP PADDLE BOARD: WHERE YOU CAN FIND MORE ABOUT PADDLE BOARD TECHNIQUE
We hope that this overview of the basics of SUP technology will help you with your first excursions on the water.
And remember: Practice is key and even fun with SUP!
So off to the water and get wet! If you still want to know more about How to Paddle Board and SUP paddle techniques, take a deeper look at the other tips in our SUP guide.
