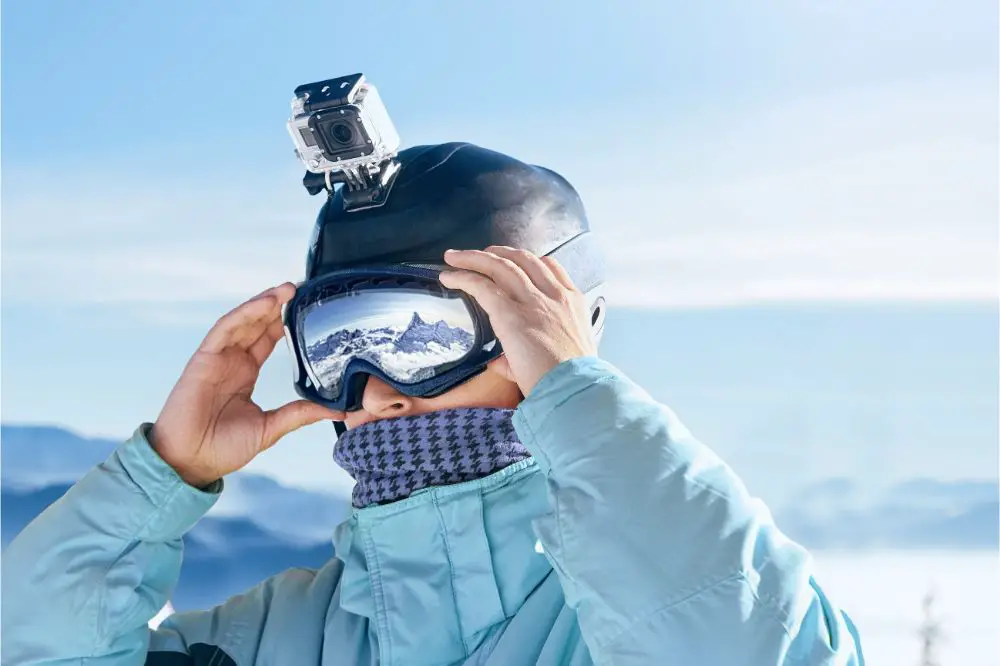
The GoPro Hero 10 is a game-changer for avid skiers looking to capture their adrenaline-fueled adventures on the slopes. This latest addition to the GoPro family boasts an array of advanced features tailored to elevate your ski footage, making it the ultimate choice for winter sports enthusiasts.
One of the standout features of the GoPro Hero 10 is its powerful GP2 processor, which enables lightning-fast performance and enhances video stabilization. The camera also supports 5.3k resolution at up to 60 frames per second, allowing you to capture ultra-crisp, smooth ski footage like never before.
The Hero 10’s HyperSmooth 4.0 stabilization technology works to eliminate camera shake while skiing, ensuring your videos are steadier and more professional-looking.
You can also look forward to an improved TimeWarp 4.0, which creates stunning time-lapse videos while on the move – perfect for capturing your entire ski journey in a single video.
Avid skiers will appreciate the camera’s SuperPhoto + HDR mode, which automatically enhances images by combining multiple shots, so you get the best possible result without the need for manual editing. Not only does this feature save time, but it also ensures every photo you take looks picture-perfect.
Another plus is the front-facing color screen on the Hero 10, which makes framing and capturing selfies easier than ever. Additionally, the touchscreen on the back of the device offers intuitive controls, such as swipe and tap functions, making it user-friendly, even with gloves on.
Voice commands are also supported by the Hero 10, so you can control your camera while skiing without having to use your hands, meaning less interruption to your winter sports experience.
As you can already tell, the GoPro Hero 10 is packed with features designed to enhance your skiing footage.
In the upcoming sections, we will guide you through choosing the right settings and equipment, as well as providing filming techniques, advice on protecting your camera, and information about editing and sharing your skiing adventures.
All set?
Then let’s head to the slopes and learn how to get the most out of your GoPro Hero 10 for skiing!
Choosing the right settings for skiing
The GoPro Hero 10 is an ideal choice for capturing your thrilling ski adventures with its impressive set of features.
However, selecting the right settings is vital for maximizing the quality of your videos and avoiding disappointment. Here are some tips to help you choose the right settings for skiing with Hero 10.
Firstly, ensure you’re using the most up-to-date firmware for your camera. This will guarantee access to the latest features and performance enhancements.
When filming ski runs, a higher frame rate, such as 60fps or 120fps, will enable smooth footage and the flexibility to slow down sections for dramatic effect. The Hero 10 supports up to 4K resolution at 120fps, offering excellent image quality even at high speeds.
To improve exposure in bright, snowy environments, use the native ISO between 100 and 800. This will prevent overblown highlights and crushed shadows. Also, utilize the camera’s auto-exposure settings or experiment with exposure compensation to find the perfect balance.
For better color accuracy, switch to a “flat” color profile. This will provide more latitude in post-processing and allow you to easily apply custom color grades using editing software.
Finally, activate the camera’s HyperSmooth stabilization to minimize shake and ensure silky footage even on the roughest ski runs. With these settings in place, you’ll be well-equipped to capture stunning ski memories with your GoPro Hero 10.
Resolution and frame rate
For optimum ski footage, set your GoPro Hero 10 resolution to 4K or 5K for crisp, detailed video, and use a high frame rate (60fps to 120fps) for capturing smooth action and enabling slow-motion playback. Higher frame rates might require more memory, so ensure you have sufficient storage space.
Stabilization
For smooth skiing footage, make use of the GoPro Hero 10’s HyperSmooth 4.0 stabilization feature. This advanced technology automatically adjusts the camera’s movement to reduce shakiness and provide a steady recording. Experiment with different stabilization settings to find the perfect balance, ensuring crisp and stable ski videos.
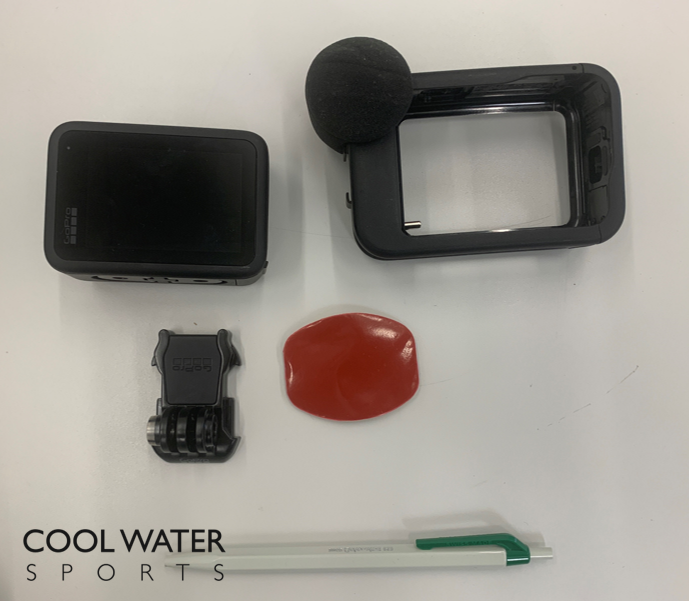
Why a case is needed for skiing
When skiing, wind noise is one thing to be aware of when filming. I have had good experiences with a case that has microphone protection. This reduces the annoying wind noise massively, so that you can hear much more of the actual riding sounds.
Selecting the perfect mount for skiing
When it comes to capturing your skiing adventures, having the perfect mount is essential. The GoPro Hero 10 offers various mounting options, ensuring you get the best footage of your experience. A popular option is the helmet mount, which provides a first-person perspective and captures stable footage. Alternatively, the chest mount offers a unique point of view, showcasing your skis and the surrounding scenery. Lastly, the pole mount allows for creative angles and the ability to film others or yourself. Each mount has its benefits, so consider your desired outcome to choose the most suitable option for your skiing footage.
Helmet mount
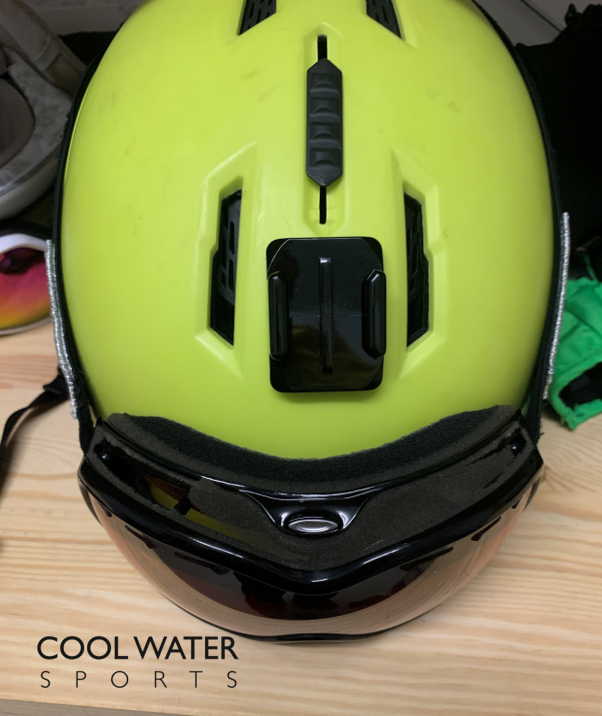
A helmet mount is ideal for skiing as it offers a first-person perspective and keeps your hands free.
Attach the GoPro on the front or side of your helmet using adhesive mounts or straps.
On the picture you see the position where I have the GoPro Mount on my helmet.
Important: Make sure it’s secure and angled correctly to capture smooth, stable footage while you carve down the slopes.
Therefore I always make a short test shot when I mount it the first time, just to be sure that everything is still like I want it to be. Furthermore you need to wear your helmet rather tight, otherwise it will bother you when it wobbles around due to the additional weight of the GoPro.
Pros
+ Naturally good camera angle
+ You have your hands free and it doesn’t obstruct your movement
+ It is easy to find the right angle of the mounting device and the mounting is very stable and reproducible. Just make sure that you judge it after a first short ride.
Cons
– When it is windy and with your helmet on, you often cannot not hear if the camera is in recording.
– Even though the camera is lightweight, it is a little distracting because it pulls a little on the helmet
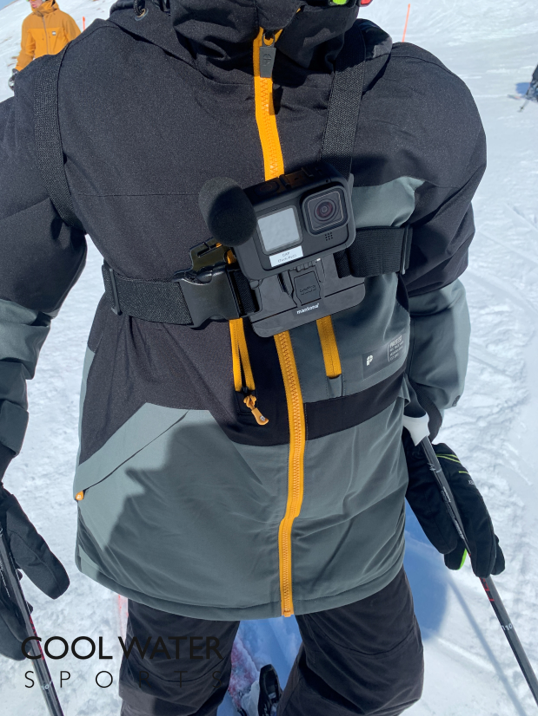
Chest mount
The chest mount is another popular choice for skiers as it offers a more immersive point of view. With the camera positioned on your chest, the footage captures a perspective closer to your line of sight.
This mount is ideal for filming ski runs, carving turns, and showcasing the surrounding scenery.
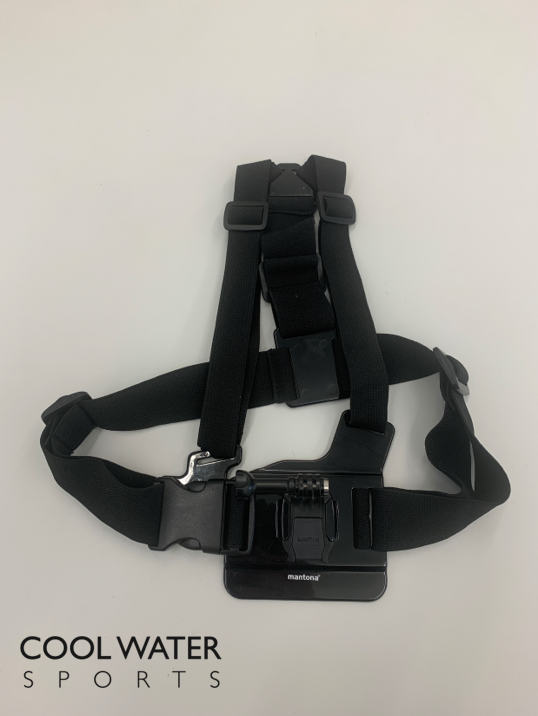
Pros
+ You can easily see if the camera is running
+ You can capture some really great PoV shots
+ It is very comfortable to wear and the camera does not obstruct your movement
Cons
– It is harder to find the right camera angle, especially in combination with the movements of your upper body during riding.
– The mounting isn’t as stable and reproducible compared to mounting it on the helmet
Pole mount
The pole mount is another popular option for skiers, as it offers dynamic, immersive shots with ample stability. By attaching your GoPro Hero 10 to a ski pole or monopod, you’ll be able to capture those exhilarating moments from a unique perspective while maintaining control of your movement down the slopes.
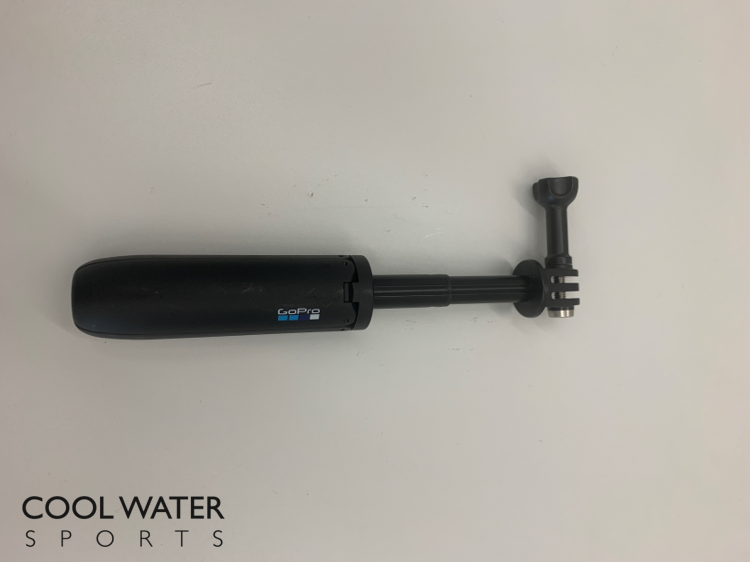
Pros
+ You can make shots with very unique and special angles
+ Videos seem very action-packed, especially when skiing deep snow
Cons
– As you have to hold the pole, one of your hands is not free for skiing. So you need some more skiing skills, as you need to be able to ride comfortably while also concentrating on filming.
– It takes some experience to constantly align the pole with the camera correctly even while riding
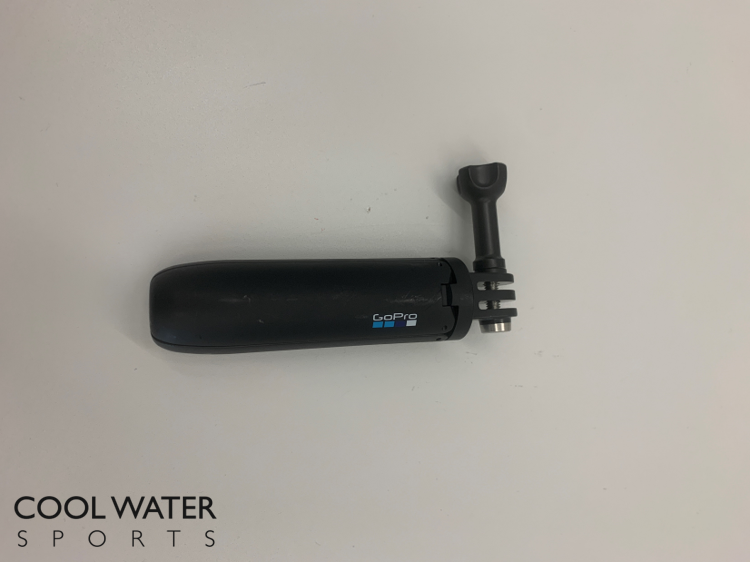
Holding the GoPro
A fun way to make dynamic videos with different settings is to hold it directly in your hand. To hold the camera more easily, it is recommended to use such a handheld, because it is much easier and safer to hold it, plus you have less of a problem with the glove getting in front of the lens.
Pros
+ Very easy and comfortable to operate the camera
+ Full freedom to do shots in different angles, PoVs
+ One can make very dynamic videos very easily
Cons
– As with the pole, you do not have both hands free for skiing.
– Holding the camera in your hand is certainly the biggest risk, because you can easily lose it on the slope, e.g. in a fall.
Optimizing your GoPro battery life on the slopes
To optimize your GoPro battery life on the slopes, it’s crucial to keep the camera warm.
Cold temperatures can quickly drain the battery, so try storing your GoPro close to your body when not in use or use an insulated case.
Additionally, consider using external battery packs to extend shooting time. These portable power sources can be a lifesaver when you’re out in the cold all day. As a bonus tip, fully charge the batteries and bring spares so you won’t have to worry about missing any action-packed moments on the slopes. Happy skiing!
Keeping it warm
To keep your GoPro Hero 10 warm on the slopes, store it in an inner pocket close to your body until you’re ready to film. Avoid exposing it to cold temperatures for extended periods, as this can cause your battery life to decrease rapidly. If necessary, consider using hand warmers to maintain warmth.
Using external battery packs
To extend your GoPro’s battery life while skiing, consider using external battery packs. These portable power sources can be connected to your GoPro through a USB cable, allowing you to recharge on the go. Choose a compact, weather-resistant battery pack designed for outdoor activities to ensure durability and easy storage in your ski gear.
Filming techniques and tips for skiing
Now that you have your GoPro Hero 10 set up with the perfect mount and optimized battery life, it’s time to focus on the actual filming process. Capture the excitement and beauty of skiing with these techniques and tips.
First, aim to capture action shots that showcase your skiing skills. Keep the camera pointed towards the terrain, and try to maintain a steady hand while skiing to minimize vibrations in the footage. Don’t be afraid to experiment by filming jumps, turns, and even wipeouts to make your video more engaging.
Next, vary your filming perspectives to add depth and interest to your footage. Alternate between point-of-view (POV) shots using the helmet or chest mount and third-person perspectives with the pole mount. This will help to break the monotony and give viewers a more comprehensive insight into your skiing experience.
Time-lapse and slow-motion features can be valuable tools for capturing unique moments. Use time-lapse photography to document your entire ski journey or highlight a specific scene, such as a breathtaking mountain vista. On the other hand, slow-motion video can emphasize dramatic action sequences, like a high-speed turn or an impressive jump.
Don’t forget to pan the GoPro camera to capture the full scope of the surroundings, and occasionally include shots of fellow skiers or interesting landmarks you encounter. Including these elements in your skiing video will make it more immersive and enjoyable for viewers, ensuring that your GoPro Hero 10 footage truly stands out.
Capturing action shots
To capture thrilling action shots, keep your GoPro Hero 10 close to the subject and use a wide field of view. Experiment with various mounts and angles, such as low-to-the-ground or over-the-shoulder shots, to create dynamic footage. Don’t forget to incorporate smooth turns and jumps for that extra adrenaline rush!
Filming in different perspectives
Filming in various perspectives adds diversity to your skiing footage. Experiment with different camera angles and mount locations, such as low and close to the ground or facing back at the skier. By capturing unique perspectives, you’ll create a dynamic and engaging video to showcase your skiing adventures.
Using time lapse and slow motion
Utilize the Hero 10’s time-lapse and slow-motion features to create dynamic footage on the slopes. Time-lapse helps showcase the progression of your ski session, while slow motion emphasizes thrilling moments and captures precise techniques. Experiment with different frame rates to find the perfect balance of smoothness and detail.
Protecting your GoPro from harsh winter conditions
To ensure your GoPro Hero 10 stays protected from the harsh winter conditions and for reducing the annoying wind noise, it’s essential to use a casing with microphone protection.
Another crucial aspect to consider is how you handle your GoPro in icy and snowy conditions. Make sure to keep the lens free of snow and ice, as this can significantly affect image quality. Additionally, regularly wipe the camera body to prevent ice build-up, and store it in a dry and warm place when not in use.
Handling icy and snowy conditions
During icy and snowy conditions, it’s crucial to protect your GoPro Hero 10.
Always carry a microfiber cloth to wipe off moisture or snow that accumulates on the camera. Ensure your SD card slots and charging ports are sealed, and be cautious while handling your GoPro, as it may become slippery in the cold weather.
Editing and sharing your skiing footage
GoPro Studio is a user-friendly video editing software designed for beginners. It simplifies the process of creating professional-quality videos with its intuitive interface and pre-designed templates.
With GoPro Studio, you can easily import footage, trim clips, add music, and apply stunning visual effects to create memorable moments. The software also supports time-lapse and slow-motion features, enabling users to play with the speed of their footage for dramatic effects. GoPro Studio is ideal for those new to video editing, offering seamless integration with GoPro cameras and making video creation a breeze.
However, which software you use is mainly based on your personal preferences. Here we want to focus on Quik, which is the video editing app from GoPro itself. Quik allows you to edit your videos right on the spot with your mobile phone.
Using the GoPro editing software App Quik
Quik is an app for your smartphone. Quik offers you some cool features:
– you can connect the GoPro directly to the GoPro and have the videos directly available in the app.
– Quik offers a few cool themes that you can use for the videos
– Quik has various music to choose from that you can use without any copyright worries
– Editing different videos, making smaller inserts, and packaging videos together is definitely easy and can also be done quickly right on the phone
– the operation is very simple and intuitive, so you learn how to use Quik very quickly
Disadvantages are certainly that the edit options are certainly limited compared to other video software. ButQuik is definitely a cool app to quickly cut a few videos from the best shots.
Sharing on social media platforms
To share your skiing adventures on social media, simply connect your GoPro Hero 10 to your smartphone using the GoPro AppQuik.
This app allows you to preview, edit, and share your footage on popular platforms like Instagram, Facebook, and YouTube, ensuring your friends and followers can experience the thrill of the slopes right alongside you.
Additional accessories for skiing enthusiasts
For skiing enthusiasts, there are plenty of additional accessories to enhance your GoPro Hero 10 experience. Consider investing in a smart remote, compatible microSD cards, and extra batteries.
These accessories will further elevate your skiing footage and ensure you capture every thrilling moment.
Conclusion
In conclusion, the GoPro Hero 10 is a fantastic tool for capturing your skiing adventures, offering amazing features and versatility. By choosing the right settings, Action Camera mounts, and accessories, as well as mastering filming techniques and post-production, you’ll create and share breathtaking skiing footage that will impress your friends and family.